My Basic Wpf Text Editor
My first contact with WPF
Now that Windows 8 is out with the new Microsoft Metro (see [1]) it is time for me to have a deeper look at WPF (Windows Presentation Foundation, see [2]). WPF is what replaces Windows Forms and greatly adds features and powers to the user interface design process.
My first reaction to WPF was to think of the Glade User Interface Designer (see [3]) - I don't really know how relevant the comparison is as of yet.
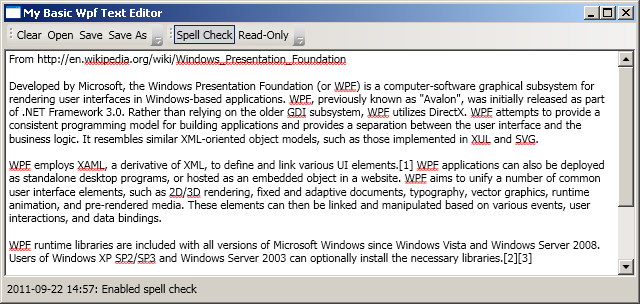
My first little tutorial will be on making a simple text editor (you can never have too many text editors, right?). Once we have walked through this tutorial you should be able to have produced something like the below screen shot. This is a text editor with a tool bar row in the top, a text field in the middle and a status bar at the bottom. The text is spell checked.
Making WPF Applications
In the Windows Forms era Visual Studio always generated a magic designer file - and of you edited code in it you typically broke the application. This file typically contained a lot of information about graphical elements, where they were located and so on. Remember: this information was regular C# code. Now, in WPF you can think of this designer file as being replaced with an XML file - in Microsofts world XAML (for Extensible Application Markup Language, see more [4]).
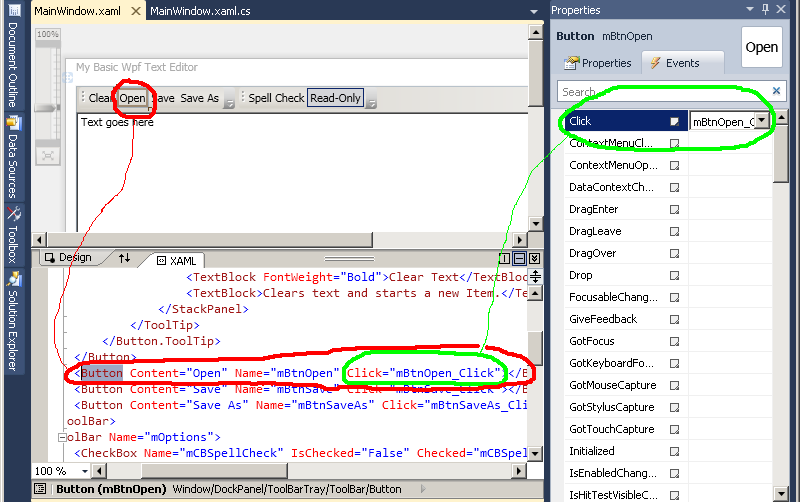
Working in XAML makes me think of one of my first jobs where I used to hack lots of HTML - making forms in HTML is for me a lot like writing XAML. But you do not have to "code" in XAML - you can just as well add your buttons and your status bar in C# code - it is just removes the visual part from Visual Studio. there is a lot of talk about how excellent this separation of code and design is - but as a code-centered person I am a bit bothered with how much code you can put into the XAML. The below image shows what it is like editing a button inside Visual Studio. As you can see the XAML code contains a declaration of a button (inside a toolbar (inside a toolbar tray (inside a dock panel (inside a window)))). Now here is where I think it is starting to become creepy: the name of the button mBtnOpen is declared here in the XAML - there is no Button mBtnOpen = new Button(); anywhere in the code. This is the first sign of Wpf being something different. In the screen shot you can also see the event list of this button - the method mBtnOpen_Click is called upon click. This code is however written in the C# code.
WPF Controls used
General Layout
After looking at the superb intro to Wpf at [5] I found the DockPanel to suit me well (see more options at [6]). So the general idea is for my user interface something like this:
<Window>
    <DockPanel LastChildFill="True">
        <ToolBarTray />
        <StatusBar DockPanel.Dock="Bottom" />
        <TextBox />
    </DockPanel>
</Window>
After this general idea I can add tool bars to the tool bar tray, buttons to the tool bars, and so on. I can also just push in a few items in the status bar - in my case just a text block. There is also quite a bit of work to do on the text box.
The tool bars
The second of the tool bars - the ones with some simple options consists of two buttons with names, a checked/unchecked state, and two events defined, like this:
<ToolBar Name="mOptions">
    <CheckBox Name="mCBSpellCheck" IsChecked="False" Checked="mCBSpellCheck_Toggle"
     Unchecked="mCBSpellCheck_Toggle">Spell Check</CheckBox>
    <CheckBox Name="mCBReadOnly" IsChecked="True" Checked="mCBReadOnly_Toggle"
     Unchecked="mCBReadOnly_Toggle">Read-Only</CheckBox>
</ToolBar>
In the code for the events I have a little null-guard:
private void mCBSpellCheck_Toggle(object sender, RoutedEventArgs e)
{
    if (mTB != null)
    {
        mTB.SpellCheck.IsEnabled = (mCBSpellCheck.IsChecked == true);
        UpdateStatBar((mTB.SpellCheck.IsEnabled ? "En" : "Dis") + "abled spell check");
    }
}
The status bar
In general I believe it is a bad idea to have hard coded sizes - but here I make an exception and used the default value of 23. Here the property DockPanel.Dock is used to put the status bar at the bottom. Inside the status bar is a status bar item with a text block.
<StatusBar Height="23" Name="mStatBar" DockPanel.Dock="Bottom">
    <StatusBarItem DockPanel.Dock="Left">
        <TextBlock Name="mStatText" Text="Ready." />
    </StatusBarItem>
</StatusBar>
The text box
Thanks to the LastChildFill="True" propery of the dock panel the and the fact that the text box comes last in the code the text box fills the space left after the tool bar tray and the status bar.
I first enabled spell checking but later disabled it in favor of the button in one of the tool bars. The XAML code here just contains some settings on scroll bars and so on. Here is one of the obvious examples to show people when they say "XAML is so good because you don't have to write so much code". To me this is just as bad or worse than coding in C#. Reading (ugly) XML is a lot harder that reading (ugly) C#.
<TextBox
    Name="mTB" Text="Text goes here"
    AcceptsReturn="True" TextWrapping="Wrap" IsReadOnly="True"
    HorizontalScrollBarVisibility="Auto"
    VerticalScrollBarVisibility="Visible"
/>
What about the C# code?
First impressions
Since all aspects of the design of the application is stored in the XAML-file the C#-file is pretty clean and small. The price for this is of course the complexity and potential ugliness of XAML-files. The code for this application is 95 lines of code (without comments) and 30 (long) lines of XAML-code (without tool tips).
Save to file
Well, there is not much to say about the C# code really - I added two members to the "MainWindow" class: an open and one save dialogue for keeping track of the file name. These are now put in the Microsoft.Win32-namespace:
Microsoft.Win32.OpenFileDialog mDlgOpen = new Microsoft.Win32.OpenFileDialog();
Microsoft.Win32.SaveFileDialog mDlgSave = new Microsoft.Win32.SaveFileDialog();
The saving of files is written in two methods I call SaveFileAs() and SaveFile(). The events when a user clicks the save or save as buttons refer to these.
private void SaveFileAs()
{
    if (mDlgSave.ShowDialog() == true)
        SaveFile();
    else
        UpdateStatBar("Text not saved to file.");
}

private void SaveFile()
{
    System.IO.StreamWriter writer = new System.IO.StreamWriter(mDlgSave.FileName);
    writer.Write(mTB.Text);
    writer.Close();
    UpdateStatBar("Wrote " + mTB.Text.Length.ToString() + " chars in " + mDlgSave.FileName);
}
Summary and conclusion
It's about time I look at WPF and this first example took me less than a day to (i) install environment for, (ii) do research for and (iii) document in this tutorial. For a completely new technology I think that is fairly rapid.
The problem is that essential WPF knowledge does not end with this tutorial - the use of graphics in both two and three dimensions, scalable applications, and... well... a whole lot more remains to be explored.
If you liked this little tutorial you can download the source here: [7]
The next step is to take a look at Wpf Data Binding.
This page belongs in Kategori Programmering