Selenium Plus Android
In Installing Selenium I showed you how to rapidly install selenium in Ubuntu. Today we will take a look at:
- Installing Selenium (and prerequisites) under Windows
- Installing the Android SDK (including an Android Emulator)
- Making a simple web-test in the android browser from your computer
Installing Selenium and friends
Since I want to run tests in the python environment I want to start by installing python and then the selenium bindings:
- First install Python
- From f.x. [1]
- We add some fodlers to the PATH environment variable (right click my computer -> properties -> advanced -> environment variables -> add a user variable called Path where you insert "C:\Python27;C:\Python27\Scripts" - we will need the scripts folder later)
- You can install Selenium in a couple of ways - let's install pip
- download and install easy_install [2]
- if your path is ok you can now open a dos-box (Win-button + R -> cmd) and type: easy_install pip (easy_install.exe pip), and next pip install selenium (pip.exe install selenium)
- Check the installation
- In the dos box run python
- run: from selenium import webdriver
OK, that should be it - we should now have a proper python and selenium installation.
Making a first test with Firefox
If you have not installed Firefox download it from: [3] so we can test selenium.
Now open up a dos-box and, in python, run:
from selenium import webdriver
from selenium.webdriver.support.ui import WebDriverWait

driver = webdriver.Firefox()

driver.get("http://en.wikipedia.org/wiki/Main_Page")
element = driver.find_element_by_name("search")
element.send_keys('selenium')
element.submit()
try:
    WebDriverWait(driver, 20).until(
        lambda drv : drv.title.startswith("Selenium")
        )
    title = driver.title
except TimeoutException:
    title = "Not found..."

driver.close()
print "firefox title was %s" % title
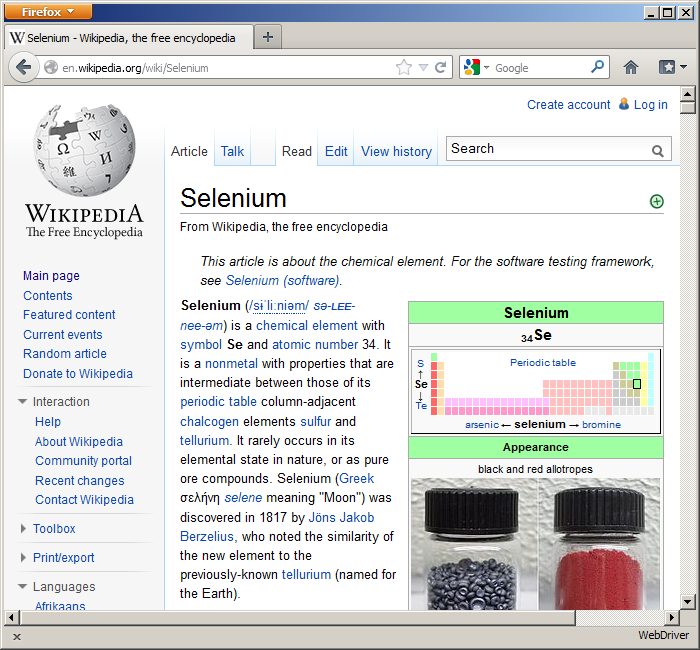
If you are quick enough you might be able to capture a screen shot that looks something like this:
Web testing with Chrome (or chromium) and Internet Explorer
In order to run the same test in Explorer or Chrome you need some specific web drivers from google code:
I just extracted the exe-files and dumped them in a folder that I added to my path-variable. If you are using Chromium instead of Chrome just copy/paste the chromium-folder from %LOCALAPPDATA%\Chromium to %LOCALAPPDATA%\Google\Chrome - you will not have to do this if you are running vanilla Chrome.
Now, in order to test in these three browsers at the same time I refactored the test script a bit:
from selenium import webdriver
from selenium.webdriver.support.ui import WebDriverWait

def check_wikipedia(driver):
    """
    Use the driver to check the searchability of wikipedia.
    Then discard the driver and return the title
    """

    driver.get("http://en.wikipedia.org/wiki/Main_Page")
    element = driver.find_element_by_name("search")

    # chrome and chromium dislikes sending "Selenium" for some reason
    element.send_keys('SeleniumTestingTool')
    element.submit()
    try:
        WebDriverWait(driver, 20).until(
            lambda drv : drv.title.startswith("Selenium")
            )
        title = driver.title
    except Exception:
        title = "Not found..."
    #driver.close() # uncomment later
    return title

print "chrome title was %s" % check_wikipedia(webdriver.Chrome())
print "firefox title was %s" % check_wikipedia(webdriver.Firefox())
print "IE title was %s" % check_wikipedia(webdriver.Ie())
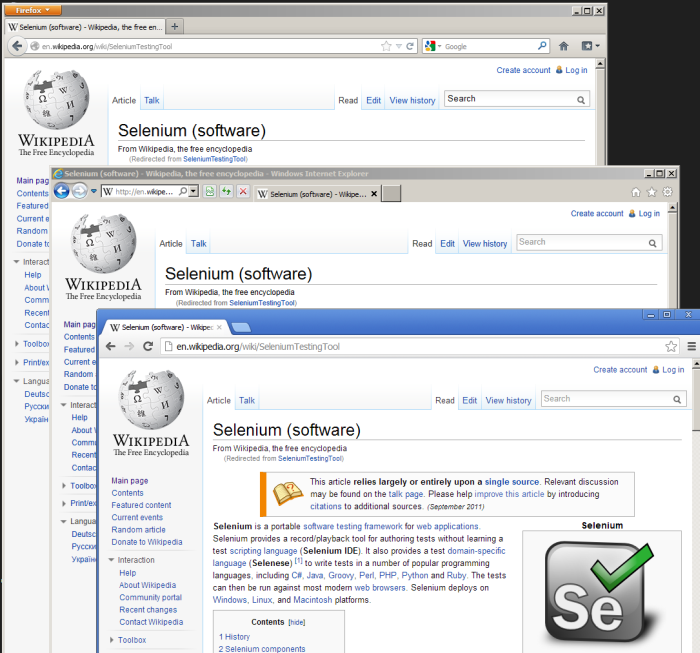
Since I uncommented the close line you will get something like this:
Android SDK
We are now ready to move on to installing the Android SDK.
- Download and install the Android sdk from [6]
- Tell the installer to start after installation
- Select the API's you want and update (I took the required tools and + 4.* + 3.2)
- Wait :-(
- Afterwards you need to update the PATH environment variable again. Add: %ProgramFiles%\Android\android-sdk\tools and %ProgramFiles%\Android\android-sdk\platform-tools (or where ever you installed the SDK)
Create and Android Virtual Device
Open up a dos-box and create a new android virtual device: android create avd -n my_android -t android-16 -c 200M - this will create an Android Virtual Device that targets android-16 with an SD-card of 200 megabytes. If it asks you to create a new hardware profile: say no.
You can start the device by for example: emulator -avd my_android -no-audio -no-boot-anim -scale .8
Prepare the Android Virtual Device for Selenium
You need the webdriver app (in APK format) for the Android Virtual Device - get it from google code: [7]
You might need to tell the device to allow unknown sources. Make sure it is enabled in Menu -> Settings -> Security -> Unknown sources.
Install and start the app - after a while it will say that it is ready.
The next step is to enable port forwarding adb forward tcp:8080 tcp:8080 (make sure you have no other service on your computer running at 8080 - like Team Foundation Server or so).
Using the same code as above we can now just add a few lines:
Run a quick test to make sure you can connect
    a_driver = webdriver.Remote("http://localhost:8080/wd/hub",
        webdriver.DesiredCapabilities.HTMLUNIT)
    print "Android Browser title was %s" % check_wikipedia(a_driver)
Test on target
OK, so far we have tested web pages on our computer in an environment we own. Now we want to perform the same test on a real Android Device - on target. We are in fact just a few steps away:
- We need to install webdriver on the target
- Start it and allow port forwarding.
- We need to tether the device and the computer in order to allow them to share network.
- Then it is rock and roll!
The webdriver app is the same as we installed in the emulator: [8]
The port forwarding command is the same ad for the emulator: [9]
Tethering can be done in many ways I guess - I tried pdanet and it worked on the first attempt: [10] You need to install it as an app on the device and as an app on the computer. Then you connect the two using a usb-cable.
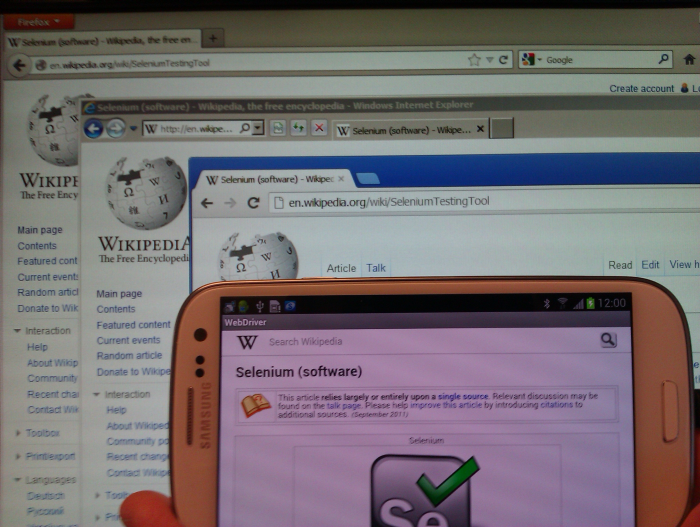
You can now run the same test as you did with the emulator (just make sure it is turned off)!
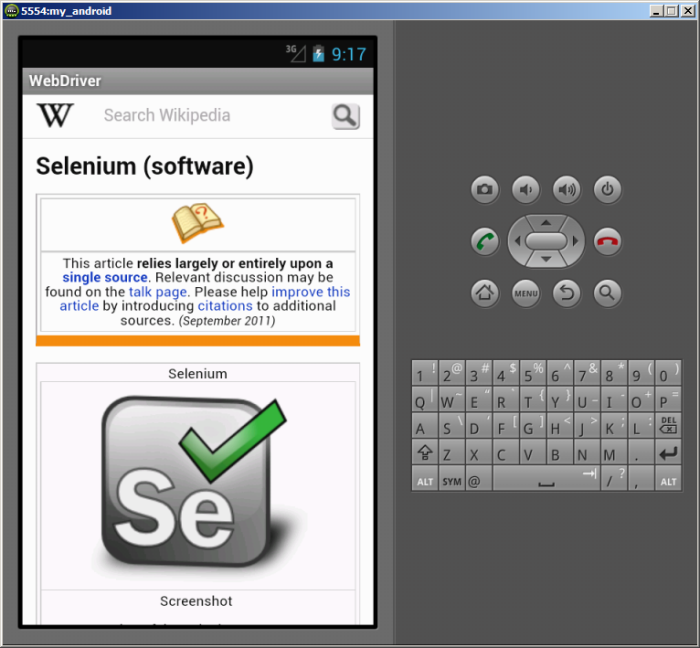
As always: I hereby provide you with the success screen shot:
This page belongs in Kategori Programmering
This page belongs in Kategori Test